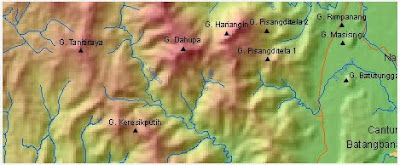
Here is one example of the use of SRTM with ArcMap to display pseudo-3D maps (not real 3D). From the pictures it appears there was a dramatic shadow effects that add to the existing topography.
 Here are the steps
A. Prepare ArcMap, open the SRTM raster data that has been projected
2. Create a data Hillshade
Data hillshade is the intensity of land receives sunlight coming at an angle and azimuth are determined.
Click on the menu Spatial Analyst> Surface Analyst> Hillshade
Azimuth: the direction of the sun
Altitude: the angle of the sun from the horizon
If you are not sure of the azimuth and altitude, let alone all by default
3. Set Transparency Hillshade
Effect Activate toolbar by right click on any toolbar. Can also be accessed via the menu Tools> Customize
Set the transparency of data Hillshade to 30 (eg)
4. Set the layer symbologi SRTM (elevation) for example, with gradations from green (lowlands) to red (high plains)
Here are the steps
A. Prepare ArcMap, open the SRTM raster data that has been projected
2. Create a data Hillshade
Data hillshade is the intensity of land receives sunlight coming at an angle and azimuth are determined.
Click on the menu Spatial Analyst> Surface Analyst> Hillshade
Azimuth: the direction of the sun
Altitude: the angle of the sun from the horizon
If you are not sure of the azimuth and altitude, let alone all by default
3. Set Transparency Hillshade
Effect Activate toolbar by right click on any toolbar. Can also be accessed via the menu Tools> Customize
Set the transparency of data Hillshade to 30 (eg)
4. Set the layer symbologi SRTM (elevation) for example, with gradations from green (lowlands) to red (high plains)
 4. The order of layer arrangement
Place the top layer Hillshade more than SRTM data (of the level)
Add the SHP roads, rivers, settlements, and annotation
Adjust the transparency layer and symbology layer Hillshade SRTM (elevation) to get maximum results
Picture examples of layer arrangements
In the ArcMap display was produced as if no shadow effect (3D) without having to use ArcScene and heat the CPU
4. The order of layer arrangement
Place the top layer Hillshade more than SRTM data (of the level)
Add the SHP roads, rivers, settlements, and annotation
Adjust the transparency layer and symbology layer Hillshade SRTM (elevation) to get maximum results
Picture examples of layer arrangements
In the ArcMap display was produced as if no shadow effect (3D) without having to use ArcScene and heat the CPU